Some businesses have very specific product names that they use which may include dates, acronyms, and other identifiers. It is an overall organized and smart practice, but to a customer's eyes, it may look unusual or simply not very appealing when they see the name on a quote or invoice. Whatever the reason, you may find yourself wanting a product's name to appear differently to customers than it appears to you and your team on the CRM side.
In Paycove, you can't outright change a product name to make it differ from what it's called in your CRM. There is also no way to have part of the product name automatically trimmed or hidden. The product's name is a vital piece of information that Paycove needs to pull in the product correctly.
However, what you can do is create a new custom field in Paycove, and then manually type in whatever you'd like the "customer-facing" name to be. You will make this new custom field with its customer-facing name visible on quotes and invoices, while hiding the product's true name. See the following steps to learn how to do this. This tutorial uses HubSpot, so the steps will differ a little if you use a different CRM.
1. Create a Custom Field
First, you'll need to create a custom field for the customer-facing name to eventually reside in. To do this, go to Properties and create the Product property in your CRM. (We've labeled it as "Alternate Title" in this example.) Click the Create button when you're done.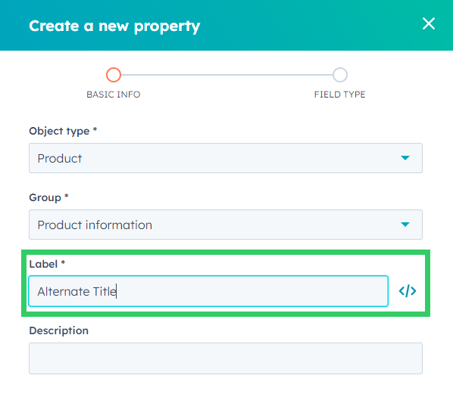
2. Enter the Customer-Facing Name
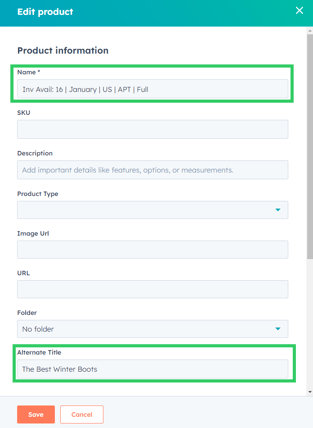
Now that the new property has been created, you should be able to find it when creating or editing a product. So when you're creating/editing a product, type the desired customer-facing name into the "Alternate Title" field. Click Save when you're done.
3. Sync Your Fields and Make Sure Your New Field is Enabled
Sync your custom fields in Paycove on the Liquid variables page.
![]()
After that, at the bottom of the page, make sure the new product field is set to Display. See how there is a check mark next to "Alternate Title." (You don't need to uncheck anything.) Then click Save Changes.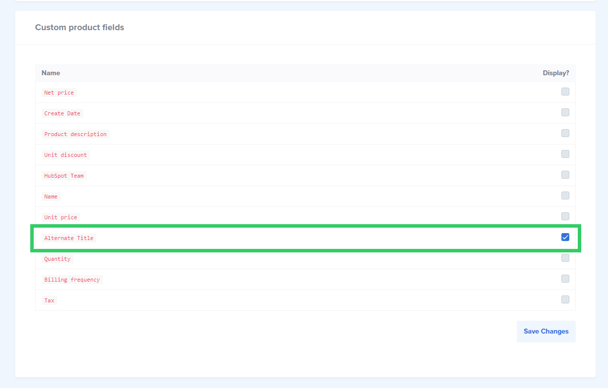
4. Make Your Customer-Facing Title Visible, and the Product's "True" Title Invisible
In the desired quote/invoice in Paycove, edit the Products section. Be sure to hide the Description field, because that contains the product's true title. You will want to display the "Alternate title," or whatever you've called your new field, instead. Check Save as default if you want all quotes/invoices to display the "Alternate title" instead of the actual product title. Click Save when you're finished.